Spring Frameworkではバージョン2.5からアノテーションを使ったコントローラの作成がサポートされています。
アノテーションベースでコントローラを作るメリットは以下のとおりです。
1.コントローラークラスが複数のアクションを処理できる
2.設定ファイルにいちいちマッピングを記述する必要がない
Springがアプリケーションのコントローラを見つけるために、設定ファイルに記述することは2つあります。
ひとつ目は、設定ファイルにspring-contextスキーマを宣言することです。
xmlns:context=~の部分です。
■application-config.xml
※これは、web.xmlで読み込む設定をした設定ファイルとなります。
<beans xmlns="http://www.springframework.org/schema/beans" xmlns:xsi="http://www.w3.org/2001/XMLSchema-instance"
	xmlns:mvc="http://www.springframework.org/schema/mvc" xmlns:context="http://www.springframework.org/schema/context"
ふたつ目は、component-scanエレメントを設定ファイルに追加します。
デフォルトでは、以下のようにコメントアウトされているはず。
<!-- Uncomment and your base-package here:
     <context:component-scan
        base-package="org.springframework.samples.web"/>  -->
この例だと、「このアプリケーションのコントローラはすべて”org.springframework.samples.web”以下にありますよ」という意味になります。
すべてのコントローラをこのcomponent-scanエレメントに設定したパッケージに格納します。
以下にアノテーションをみていきます。
@Controllerアノテーションをつけたクラスは、Springに「このクラスはコントローラーですよ」と教えることになります。
@RequestMappingアノテーションはその名の通り、リクエストとメソッドを紐付けます。
たとえば、以下のように・・・
■FriendController.java
package controller;
import org.springframework.stereotype.Controller;
import org.springframework.web.bind.annotation.RequestMapping;
@Controller
public class FriendController {
@RequestMapping(value = "/friend_input")
public String inputFriend() {
return "FriendForm";
}
}
@RequestMapping(value = “/friend_input”)と書かれた場合は、
http://domain(localhostとか)/contextroot(主にプロジェクト名)/friend_input
というURLにこのメソッドが紐付けられます。
@RequestMapping(“/friend_input”)
と書くこともできます。
もしRequestMappingのvalueが空の場合は、コンテキストルートのURLに紐付けられます。
@RequestMappingで、HTTPメソッドを指定したい場合。
たとえば、HTTP PUTかHTTP POSTだけ処理するように設定したい場合は、以下のようにmethod属性を指定します。
	@RequestMapping(value = "/friend_input", method={RequestMethod.POST, RequestMethod.PUT})
public String inputFriend() {
return "FriendForm";
}
method属性に何も指定しない場合は、全てのHTTPメソットを処理します。
RESTっぽくしたいなら、こんな感じで、コントローラクラスにURLを紐付けて、その下の階層で、そのクラスに対するアクションとURLを対応させるといいかと思います。
package controller;
import org.springframework.stereotype.Controller;
import org.springframework.web.bind.annotation.RequestMapping;
import org.springframework.web.bind.annotation.RequestMethod;
@Controller
@RequestMapping(value="/user")
public class UserController {
@RequestMapping(value="/update",method={RequestMethod.POST, RequestMethod.PUT})
public String updateUser() {
return "update";
}
@RequestMapping(value="/delete",method={RequestMethod.POST, RequestMethod.PUT})
public String deleteUser() {
return "delete";
}
}
こうすると、Userを削除したい場合は
http://localhost/contextroot/user/delete
みたいなURLでリクエストを投げることになります。
リクエストを処理するメソッド(@RequestMappingで指定したメソッド)の引数に指定できるもの、返り値として返せるものはたくさんあるので、以下のサイトを参照してください。
http://docs.spring.io/spring/docs/3.0.0.M3/reference/html/ch16s11.html
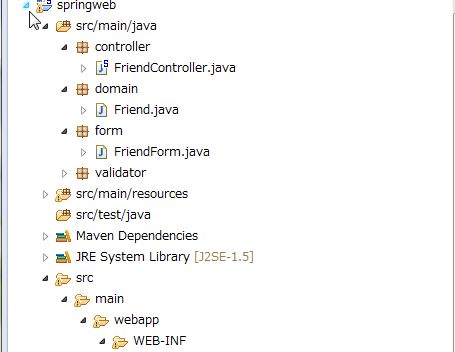
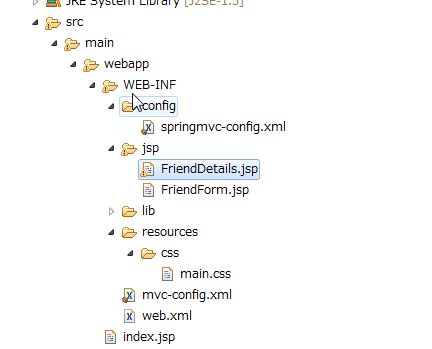
サンプルアプリを作ってみます。
フォルダ構成はこんな感じになります。


■web.xml
<?xml version="1.0" encoding="ISO-8859-1"?>
<web-app xmlns:xsi="http://www.w3.org/2001/XMLSchema-instance"
         xmlns="http://java.sun.com/xml/ns/javaee"
         xsi:schemaLocation="http://java.sun.com/xml/ns/javaee
http://java.sun.com/xml/ns/javaee/web-app_2_5.xsd"
         id="WebApp_ID" version="2.5">
<!--
		- Servlet that dispatches request to registered handlers (Controller implementations).
	-->
<servlet>
<servlet-name>springweb</servlet-name>
<servlet-class>org.springframework.web.servlet.DispatcherServlet</servlet-class>
<init-param>
<param-name>contextConfigLocation</param-name>
<param-value>/WEB-INF/config/springmvc-config.xml</param-value>
</init-param>
<load-on-startup>1</load-on-startup>
</servlet>
<servlet-mapping>
<servlet-name>springweb</servlet-name>
<url-pattern>/</url-pattern>
</servlet-mapping>
</web-app>
上のweb.xmlでは、
<param-value>/WEB-INF/config/springmvc-config.xml</param-value>
のように、springmvc-config.xmlを読み込むように記述されているため、WEB-INF/config/以下にある、
springmvc-config.xmlを作成します。
■springmvc-config.xml
<?xml version="1.0" encoding="UTF-8"?>
<beans xmlns="http://www.springframework.org/schema/beans" xmlns:xsi="http://www.w3.org/2001/XMLSchema-instance"
	xmlns:p="http://www.springframework.org/schema/p"
	xmlns:context="http://www.springframework.org/schema/context"
	xmlns:mvc="http://www.springframework.org/schema/mvc"
	xsi:schemaLocation="http://www.springframework.org/schema/beans http://www.springframework.org/schema/beans/spring-beans.xsd
		http://www.springframework.org/schema/context http://www.springframework.org/schema/context/spring-context.xsd http://www.springframework.org/schema/mvc http://www.springframework.org/schema/mvc/spring-mvc.xsd">
<context:component-scan
		base-package="controller"/>
<mvc:annotation-driven/>
<!--
	<mvc:resources mapping="/*.html" location="/" />
	<mvc:resources mapping="/css/**" location="/css/" />
	-->
<mvc:resources mapping="/resources/**" location="/WEB-INF/resources/" />
<bean id="viewResolver"
		class="org.springframework.web.servlet.view.InternalResourceViewResolver">
<property name="prefix" value="/WEB-INF/jsp/" />
<property name="suffix" value=".jsp" />
</bean>
</beans>
component-scanはSpring MVCにスキャンするパッケージを知らせる役割を果たします。
resouceタグは、Spring MVCに固定的なリソースの場所を指定します。
resourceで定義した場所は、/WEB-INF/resoucesにmappingされているので、
CSSは/WEB-INF/resources/css/main.cssみたいに置いて、
それを読み込む側は、以下のように書けばOKです。
あとでソースコード全体を載せます。
<link rel="stylesheet" type="text/css" href="<c:url value='/resources/css/main.css'/>" />
■controller.FriendController
package controller;
import org.apache.commons.logging.Log;
import org.apache.commons.logging.LogFactory;
import org.springframework.stereotype.Controller;
import org.springframework.ui.Model;
import org.springframework.web.bind.annotation.RequestMapping;
import domain.Friend;
import form.FriendForm;
@Controller
public class FriendController {
private static final Log logger =
LogFactory.getLog(FriendController.class);
@RequestMapping(value="/friend_input")
public String inputFriend() {
logger.info("inputFriend called");
return "FriendForm";
}
@RequestMapping(value="/friend_save")
public String saveFriend(FriendForm friendForm, Model model) {
logger.info("saveFriend called");
Friend friend = new Friend();
friend.setName(friendForm.getName());
friend.setAge(Integer.parseInt(friendForm.getAge()));
friend.setHeight(Float.parseFloat(friendForm.getHeight()));
model.addAttribute("friend", friend);
return "FriendDetails";
}
}
■domain.Friend
package domain;
public class Friend {
private String name;
private int age;
private float height;
public Friend() {
}
public Friend(String name) {
this.name = name;
}
public String getName() {
return name;
}
public void setName(String name) {
this.name = name;
}
public int getAge() {
return age;
}
public void setAge(int age) {
this.age = age;
}
public float getHeight() {
return height;
}
public void setHeight(float height) {
this.height = height;
}
}
■form.FriendForm
package form;
public class FriendForm {
private String name;
private String age;
private String height;
public String getName() {
return name;
}
public void setName(String name) {
this.name = name;
}
public String getAge() {
return age;
}
public void setAge(String age) {
this.age = age;
}
public String getHeight() {
return height;
}
public void setHeight(String height) {
this.height = height;
}
}
■FriendForm.jsp
<%@ page language="java" contentType="text/html; charset=UTF-8" pageEncoding="UTF-8"%>
<%@ taglib uri="http://java.sun.com/jsp/jstl/core" prefix="c" %>
<!DOCTYPE html>
<html>
<head>
<title>友達入力</title>
<link rel="stylesheet" type="text/css" href="<c:url value='/resources/css/main.css'/>" />
</head>
<body>
<div id="global">
<form action="friend_save" method="post">
<fieldset>
<legend>友達を追加します</legend>
<label for="name">おなまえ:</label>
<input type="text" id="name" name="name" tabindex="1">
<label for="age">年齢:</label>
<input type="text" id="age" name="age" tabindex="2">
<label for="height">身長:</label>
<input type="text" id="height" name="height" tabindex="3">
<div id="buttons">
<input id="reset" type="reset" tabindex="4">
<input id="submit" type="submit" tabindex="5"
                    value="友達を追加">
</div>
</fieldset>
</form>
</div>
</body>
</html>
■FriendDetails.jsp
<%@ page language="java" contentType="text/html; charset=UTF-8" pageEncoding="UTF-8"%>
<%@ taglib uri="http://java.sun.com/jsp/jstl/core" prefix="c" %>
<!DOCTYPE HTML>
<html>
<head>
<title>友達詳細</title>
<link rel="stylesheet" type="text/css" href="<c:url value='/resources/css/main.css'/>" />
</head>
<body>
<div id="global">
<h4>友達を登録しました</h4>
<p>
<h5>詳細は以下のとおりです:</h5>
名前: ${friend.name}<br/>
年齢: ${friend.age}<br/>
身長: $${friend.height}
</p>
</div>
</body>
</html>
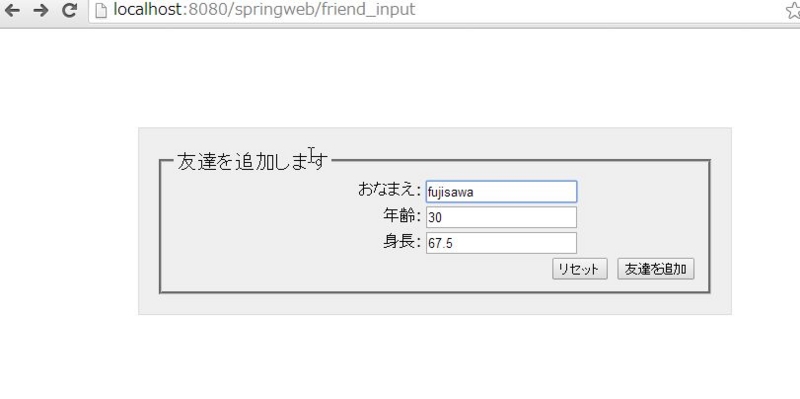
ブラウザに表示されるイメージは以下のようなものです。


<参考にした本>

- 作者: 掌田津耶乃
- 出版社/メーカー: 秀和システム
- 発売日: 2013/11
- メディア: 単行本
- この商品を含むブログ (1件) を見る

- 作者: Paul Deck
- 出版社/メーカー: Brainy Software
- 発売日: 2013/10/18
- メディア: Kindle版
- この商品を含むブログを見る
お金があるかないかで人生の楽しさは全く変わってきます。
お金があっても幸せになれるとは限りませんが、お金がない人生は不幸です。
お金がなかった私が、転職して年収1000万を超えるまでにお世話になったブログを紹介します。
エンジニア転職のリアル
今の時代は、お金を稼げるかどうかは能力の有無よりも触れた情報の質によるものが大きいです。
ぜひ皆さんも良質な情報に触れて、お金持ちになって人生を充実させてください。